
 Peel-and-Stick seal and waterproof tapes are commonly used to prevent water from intruding into structures such as homes, commercial buildings, and recreational vehicles. These tapes provide outstanding long-term and life time performance when used properly. Proper use of tapes refers to not only the service environment but also how the tapes have been applied to details of complex shapes and penetrations and, most importantly, how well the surface has been prepared for application.
Related article: Maximizing Adhesion of Peel and Stick Tapes in 3 Simple Steps
Preparing the surface properly prior to installing the self-adhesive tape s crucial to achieve a good bond. The objective in surface preparation is to maximize adhesion of the waterproofing tape to the substrate. A strong bond can prevent failures such as delamination, peeling, and blistering.
Surface preparation should be performed in 3 steps.
- Inspection
- Cleaning and profiling
- Environmental monitoring
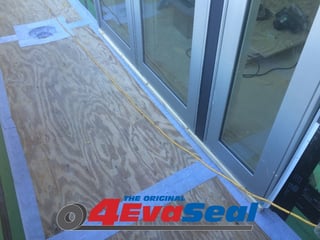 Let’s consider wood surfaces such as plywood or OSB for instance. If the surface was painted, is the paint well adhered? Is the paint cracked, peeling or flaking off? Is the wood wet, does it contain any signs of rot or softness? Was any foreign material spilled on the surface such as an oil, grease, or other chemical contaminent? Is the wood clean, free of dirt, dust, or other debris? Finally, is it smooth or rough in nature? Any of these conditions will prevent a good bond to the wood surface. In many cases, the presence of moisture, rot, contamination, or paint may warrant replacement of the wood prior to installation of the tape.
Other items to consider are gaps, seams, and fasteners. The surface should be smooth and uniform with little to no gaps; fasteners should be screw or lock/twist nail. Fasteners can penetrate waterproofing tapes when the structure moves, causing premature failure of the tapes.
If the surface is pressure treated wood, OSB, or chip board, the manufacturer of the waterproofing tape should be contacted to determine if these surfaces may be adhered to acceptably or require any special treatment.
A similar approach can be taken with concrete, wood, and plastics. Regardless of the surface type, always consult the manufacturer’s product data records, installation guidelines and contact the manufacturer to discuss specific conditions or concerns.

(Concrete surface containing dirt and remnants of a previously applied paint. Loose paint material needs to be removed and the concrete will likely require a pressure washing to remove any remaining dirt, followed by sufficient dry time.)
2. Surface preparation: Clean and profile the surface, if needed. Self-adhesive tapes typically will not require an aggressive profile; smoother surfaces will typically provide greater contact between the adhesive on the tape/film and the substrate. Cleaning can be accomplished utilizing grinders, vacuums, sanders, detergents and solvents. There are many methods to choose from. The manufacturer of the product you intend to use will recommend the best method based on your needs.
When step 2 is complete the surface should be clean, dry and ready to receive the sealing tape or waterproofing.
Related article: How To Select The Right Tape For Long-Term Performance
3. Environmental monitoring: This is often overlooked. The range of temperatures, humidity, and other environmental conditions that affect a self-adhesive tape can be limited. As with the previous two (2) steps, the manufacture will provide guidance on acceptable conditions for installing the waterproofing tape.
In part 2 of this blog we’ll review how environmental conditions can affect the installation and performance of tapes and self-adhesive waterproof membranes.
In the mean time if you have any question, please contact us.